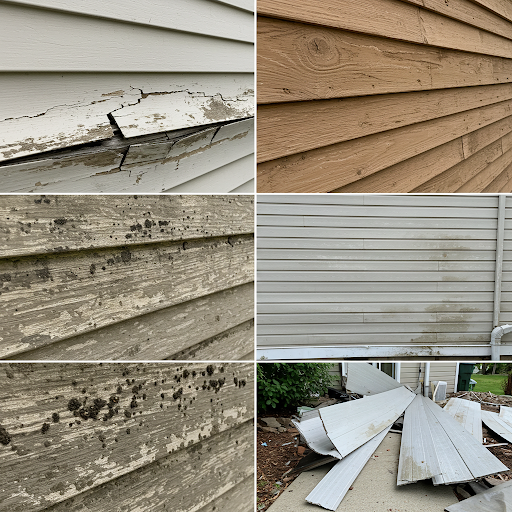
5 Common Siding Problems and How to Fix Them

Cracks and Gaps

Siding is your home’s first line of defense against the elements, playing a crucial role in protecting your property while enhancing curb appeal. Over time, however, even the most durable siding can experience wear and tear due to weather, age, or improper installation. Recognizing common siding problems and knowing how to address them can save you money and prevent more serious issues. Below, we’ll explore five common siding problems and offer practical solutions to fix them.

Cracks and gaps in siding are a common issue caused by weather fluctuations, impact damage, or general wear over time. These openings not only compromise the siding’s appearance but can also allow moisture, pests, and drafts to enter your home. To fix minor cracks, use a high-quality caulk to seal the gaps and prevent further damage. For larger cracks or significant damage, you may need to replace the affected siding panels entirely. Regular inspections can help catch cracks early before they worsen.

Warping and Buckling

Warping and buckling often occur when siding is exposed to extreme heat or when it is installed incorrectly, such as being nailed too tightly to the wall. Vinyl siding, in particular, is prone to this problem because it expands and contracts with temperature changes. If you notice warping, the best solution is to replace the affected panels and ensure proper installation techniques are followed. Leaving space for natural expansion during installation can prevent buckling in the future.

Mold, Mildew, and Rot

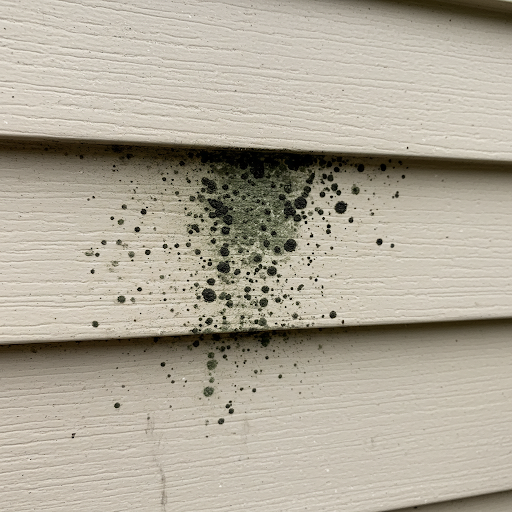
Moisture is the enemy of siding, especially in climates with high humidity or frequent rain. Wood siding is particularly susceptible to mold, mildew, and rot, but even vinyl or fiber cement siding can develop mold if water is allowed to collect behind the panels. To address this issue, first clean the affected area with a solution of water and mild detergent or a specialized siding cleaner. For rotted wood, replace the damaged sections and consider sealing your siding to make it more resistant to moisture. Regular gutter cleaning and ensuring proper drainage around your home can also help prevent mold and rot from forming.

Fading and Discoloration

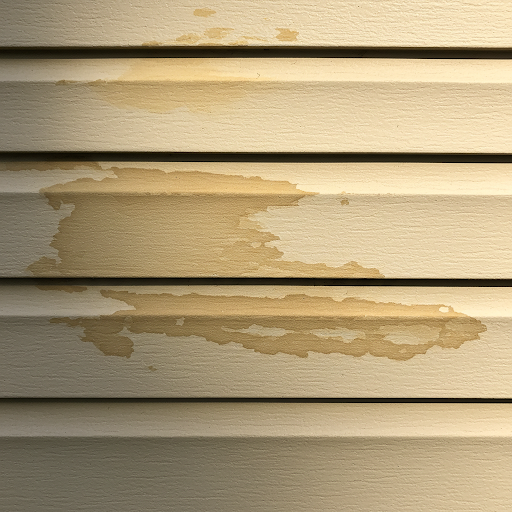
Over time, exposure to UV rays and harsh weather conditions can cause siding to fade or discolor, especially with materials like vinyl or wood. While fading is often cosmetic, it can detract from your home’s curb appeal. To restore the look of your siding, consider repainting or staining it. However, this solution works best for wood, fiber cement, or certain types of engineered siding. For vinyl siding, replacement may be the only option for restoring vibrant color. Choosing siding with UV-resistant coatings or investing in materials designed to withstand fading can help maintain your home’s appearance for longer.

Loose or Missing Panels

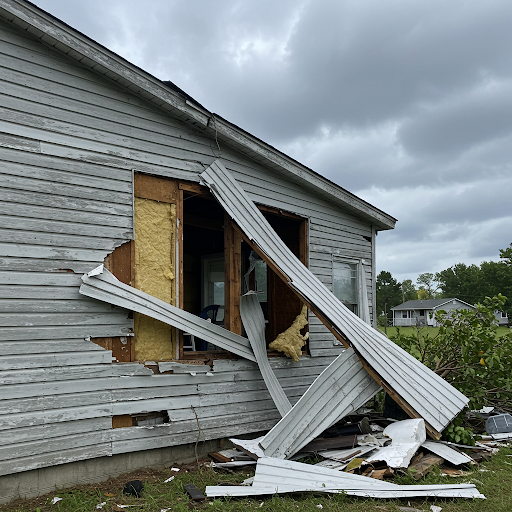
Strong winds, storms, or improper installation can cause siding panels to become loose or fall off entirely. This not only exposes your home to potential damage but also affects its insulation and appearance. To fix loose panels, you’ll need to secure them back into place using a zip tool or reinstall new panels if the old ones are damaged beyond repair. If multiple panels are missing or damaged, it may be more cost-effective to replace an entire section of siding rather than patching individual pieces. Regularly checking for loose panels after storms can help you address issues promptly.


Preventing Siding Problems

While these common siding problems can be fixed, prevention is always the best approach. Regularly inspecting your siding for signs of damage, cleaning it to remove dirt and debris, and ensuring proper installation can significantly extend its lifespan. Investing in high-quality materials that suit your local climate can also help reduce the likelihood of these issues arising in the first place.


When to Call a Professional

While minor siding issues can often be handled with DIY solutions, some problems require professional expertise. If you’re dealing with extensive damage, persistent mold, or widespread warping, it’s best to consult a siding professional to ensure the problem is resolved correctly and prevent further complications.

Siding plays a vital role in protecting your home, so addressing problems as soon as they arise is essential. By staying proactive, you can maintain your home’s exterior, preserve its value, and ensure it continues to stand up to the elements for years to come.

Out with the Old and In with the New: How to Replace Broken Vinyl Siding

Accidents happen – and they can happen to your vinyl siding. It only takes one newly-licensed driver getting too close to the house, a solid home-run hit that didn’t quite make it into the field, or a hit from a wild windstorm to ruin your vinyl siding. Unless you were hit by a tornado, hurricane or earthquake, you don’t need to re-side your entire house. Just replace the piece or pieces of vinyl siding that are damaged.

If you know how to use a hammer and nail, you can learn how to replace a broken piece of vinyl siding using simple tools. Your biggest challenge will be to not break or damage other pieces of siding in the process. It’s not as easy as gluing on a piece of vinyl siding to cover a crack, but by using a prybar and an inexpensive tool called a “zip tool” it’s easy enough for a beginner.

A zip tool is made specifically for removing and installing vinyl siding. Any hardware or lumber store that sells vinyl siding will likely sell zip tools. It’s an easy-to-use lightweight hand tool made up of a handle and a flat square hook. You’re going to use the zip tool to unlock the good vinyl siding piece from the bad vinyl siding piece.

First, look at the overlapping vinyl pieces and find the edge where a good piece of siding overlaps the top of the broken piece of siding. Put the zip tool, hook side up, between the edges. Use the tool to carefully lift the bottom of the top piece of siding to uncover the top of the broken piece. Don’t pry too hard or you might break the vinyl. Slide the tool along the interlocking edges and unlock the two pieces.

Once the edges are loosened from each other, carefully lift up the top piece to expose the J-channel. A “J-channel” is a long thin piece of vinyl (or metal) with holes in it. Your broken piece of vinyl will be nailed into the wall through the J-channel. Don’t bend the top piece of vinyl too far or it will break and you’ll have more work to do. You can now see where your broken piece of vinyl siding is nailed in through the J-channel on the wall.

Your next objective is to take the nails out of the J-channel and the wall so you can remove the broken piece of vinyl. You will not be able to fit a hammer between the two pieces of vinyl to get the nails out, so use the flat end of a pry bar. If the prybar is going to hit nearby pieces of healthy siding, put a piece of wood underneath the prybar to protect the siding.

Once the nails are out, remove the damaged piece of vinyl siding. You might have to jiggle it or pull it up or down to loosen it. You can then nail on the new piece of siding. Do not use the same holes as the old one, and make sure you drive the nails in straight and not at an angle. You will likely have to use the pry bar to hammer in the nails as well. You do this by hammering on the neck of the prybar holding the nail.

Once the replacement piece is nailed in, use the zip tool to refasten the two pieces of vinyl siding. Put the zip tool inside the edging again and pull the old strip out and over the edge of the new strip. Once you pull the edging out and over, press your hand against the zip tool to lock the vinyl edges into place. Keep sliding the tool along the edging repeating the process until it’s all locked into place.

Your siding should be as good as new. Your teenage driver will eventually stop hitting the house, and the home-run hitter will eventually grow up and make the major leagues – but you can’t stop mother nature from damaging your vinyl siding. Keep some extra pieces of siding around, and keep your prybar and zip tool handy. You never know what’s going to fly your way, but you can be sure that you’ll be able to repair the aftermath of the collision.

Repair Your Aluminum Siding Damage with a Replacement Piece

Unless you live in the middle of a desert, your aluminum-sided house is not immune to damage. (Even if you live in a desert your home would not be immune to rolling cacti and sandstorms.) Storms knock poles and gutters down, trees fall over, and rolling objects roll on a course to collision. As durable as aluminum siding is, there may be a time when a piece of siding has to be replaced. A strong arm, a good knife and some roofing cement can help you do the job.

Look at the damage and your cutting skills and ask yourself if it will be easier to replace a whole piece, or to cut off just the damaged area. Replacing the whole piece will leave a seamless finish compared to replacing a part of a whole piece of siding.

If you decide to replace a whole piece, start with cutting the damaged piece of siding lengthwise, horizontally, removing the bottom and leaving the top. The top part will be used to glue the replacement on. If your aluminum siding is the type that simulates a double row of siding, start your slicing about one inch over the center line. If you want to cut out just the section that is damaged, start with vertical cuts, approximately 12 inches from the outer side edges of the piece of siding. Then slice horizontally between cuts.

After you cut the damaged siding, you’re going to cut your new piece of siding. First, make sure that the new replacement piece of siding extends three inches beyond the ends of the damaged siding. If you’re cutting out a smaller section, make sure the new piece extends six inches. Take that piece of siding and cut off the upper edge that has slots in it.

Now it’s time for the sticky part. Get some roofing cement or adhesive caulking compound and spread a good gooey amount over the piece of cut siding that is still on the house, and spread it on the ends of the siding panel that is on the house next to the spot where the replacement piece will be put on. Take your new siding piece, with the slots cut off, align it and press it on to the cement or caulk. Make sure the new replacement siding has the top cut edge snug behind the lower edge of the overlapping siding that hangs over it. The lower edge of the new piece of aluminum siding should be over the top edge of the piece below it. Press down on the siding to get the adhesive to spread and stick. The cement will be enough to secure the new siding, but you can tighten things up by adding some blind rivets – which work just like screws.

Aluminum siding is thin enough to allow repairs to appear inconspicuous. Replacing a piece of aluminum siding is often easier than trying to bust out some dents and grooves. If you can cut through thin metal, it’s a job you can do yourself. Whether it’s a rolling cactus or a hailing rain storm that threatens your siding, you’ll be able to keep your house standing tall and looking damage-free with a quick replacement piece that’s ready to take on another falling tree.